
 |
ACCOUNT LOGIN |  |
YOUR CART |  |
  |
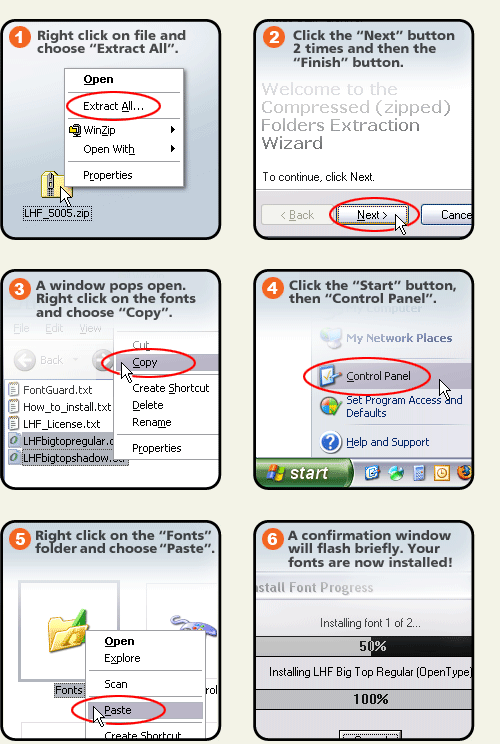
Installing Your Fonts How do I install the fonts on my PC?  How do I install the fonts on my Mac? Double click on the .zip package you saved from Letterhead Fonts. This will create a folder on your Desktop containing the font files. Double-click on the fonts to open the Suitcase utility. Click on the "Install" button to install the fonts. How do I download the fonts?
After you enter your payment information and agree to the license, you are presented with a page containing a download button for your fonts. To make things easier, all the fonts are packaged together inside of a .zip file. If you neglected to download your fonts after purchasing or something went wrong, you can login to your account and download them again. Click the "Download" button Click on the "Download" button and the process will begin. It may take up to 2 minutes for the .zip file to be created. During this time you will not see any confirmation. Clicking the download button again will consume your alotted downloads, so please be patient. Save the file to your Desktop Depending on your internet browser, you may or may not see a dialog window asking you where to save the .zip file. Choose to save the file to your Desktop. If you do not see any dialog window asking you where to save the file, but instead see only a "Downloads Finished" or similar confirmation, chances are good that the file was saved to your Desktop. Locate the saved file The file will be named something like: LHF_123456.zip. The numbers are your unique order number. Depending on your system configuration, you may or may not see the .zip extension at the end of the file. The file's icon can take on different appearances depending on the program you have chosen to open the file. For PC user's, the icon will likely appear as a yellow folder with a zipper on it or a yellow vise. For Mac users, the icon will likely be appear as a box. Follow the instructions for installing your fonts below. Why aren't the fonts showing up in my program? The program was open during installation Most programs must be closed when you install the fonts. If the fonts are not appearing the list, restart the program for the changes to take effect. Not looking for correct name All Letterhead fonts begin with the preface "LHF". This means that the Unlovable font is actually named "LHF Unlovable" and therefore would appear within the L's in alphabetical order. Fonts not installed correctly Please make sure that you have followed the instructions for installing the fonts and that you have properly extracted the fonts from the .zip package they came in. Attempting to place the .zip package itself into the Font folder will not install the fonts. They must be extracted first. A good test is to see if the fonts are available in WordPad (PC) or SimpleText (Mac). If the fonts appear there, then the fonts are installed correctly and the problem is something else. Program doesn't support Postscript OpenType fonts If your program is older (pre-2000), there is a chance that it cannot use Postscript OpenType fonts at all. Check the program compatibility chart. Unable to install font. File is either invalid or damaged.
There are two potential causes for this error. Dragging the .zip package to the Font folder You will receive this error on a PC when you attempt to drag the compressed .zip package you downloaded to the Font folder. Rest assured, there is nothing wrong with the fonts. Windows is expecting font files, not a .zip package, so it returns this error message. Never try to place a .zip file in the Fonts folder. You must first extract the fonts from the package you downloaded. After you have properly opened the package, you may drag the fonts to the Font folder to install. Please follow the instructions above for installing your fonts. Graphics card memory bug There is a known bug with certain graphics card drivers that prevent XP from using or installing OpenType fonts. The recommended fix is to update the graphics card driver. If you cannot do this or do not want to do this, the following fix also works. IMPORTANT! Do not attempt to apply this fix unless you are familiar with tweaking the Windows Registry, otherwise a mistake can cause serious problems with the system. • Click Start button, then choose Run • Type: regedit • Click OK button • Navigate to: HKEY_LOCAL_MACHINE\SYSTEM\CurrentControlSet\Control\Session Manager\Memory Management • Click on the Memory Management folder • Go to Edit > New > DWORD Value • Name the value: SessionImageSize • Right click on SessionImageSize and choose Modify • For Base, choose Decimal and type 20 for the Value Data. Then click the OK button • Close the Registry Editor and restart the computer My question or issue is not answered here. |
  |
|||
 |
 |

|
CONTACT |
|